Infographics
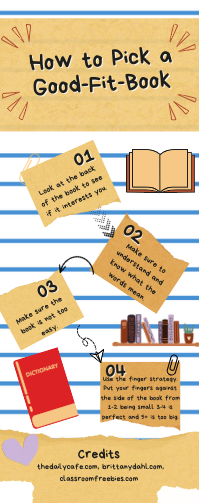
I created an infographic about good-fit-books. In the infographic, I created 4 different ways to pick a good-fit-book. At first, I started on Google Slides. However, due to the convenience of Canva with their premade infographic templates and the various ways of editing I decided to switch over to Canva. I chose the slide template that I chose because of how well it fit with the theme as well as having exactly 4 boxes to place my text into, which was the perfect amount based on what I had written down on my previous Google Slide before I switched to Canva.
During my creation of my infographic, I used 3 websites for info to add to my infographic. The first website I used was thedailycafe.com, which gave me information on the I PICK strategy, which while I did not write down the strategy, tip 1 used information from the I PICK strategy. The second website I used was britanydahl.com, which provided me with information on what a good fit book is, while also giving me information on the finger strategy, which I used on tips number 4 and number 3. Finally, for website number 3, I used
classroomfreebies.com, which gave me more information on the finger strategy, while also giving good examples on the finger strategy. I also used the Canva image search bar to get all of my images.
Another thing I decided on was the font. I chose the font Bryndan Write. I chose this font because of it having the same D.I.Y theming that the rest of my infographic. I also chose it because of the way it looked, popping out above any of
the other fonts.
The final thing I want to talk about is the ways I edited all of my images. For starters, I used Canva's image stretching tool that pops up on the border whenever you click on an image. I used this tool to make images smaller and larger to fit in spaces and to not be over the text and text boxes. Next, I used Canva's Image flipper. The Canva Image flipper shows up as a bubble at the bottom of an image when you click on the image. I used this tool to change the degree of images fit better with the images certain images went onto. The second to last tool I used was the background remover tool. I used this tool to get rid of unnecessary background stuff in images. The final tool I used was the image color changer. I used this tool to make images not blend into the background. I also used it to make images fit with the color scheme of the infographic.
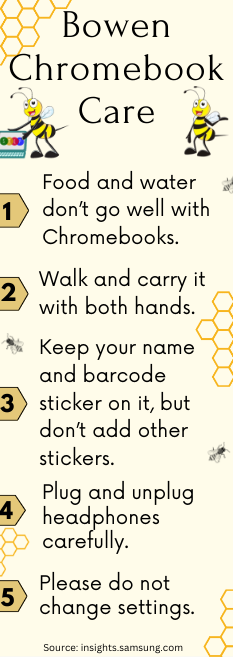
I used Canva to do this infographic. First I picked a template by searching up bee hives in the Design tab on Canva. Then, I got my information from insights.samsung.com and I added it to the text boxes. Then I added some Bowen bees and some hives to my infographic. I removed the background from the bees. This is how I did it. First I clicked edit photo and then I clicked BG remover. That is how I removed the background of the bees. Then I wrote the source which was insights.samsung.com. Then I went to the elements tab and searched "bees." I found graphics that matched my template and color scheme. I deleted the giant bee on the template because I didn't have enough room to write my information. Last, I went through everything to make sure I had no misspellings or punctuation. I made sure it was all lined up right.